40's Era Gibson L-50 Refret & Inlay Work |
|
|
|
|
|
|
|
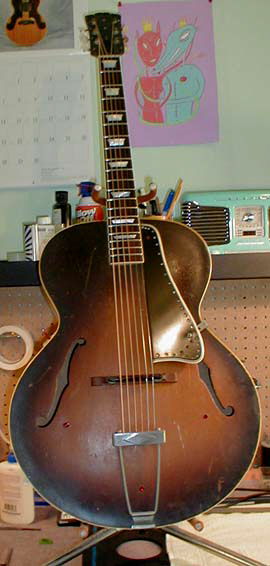
1.
A
customer was so happy with the work I did on his 1963 Framus that
he brought me this 40's Gibson L-50 archtop to work on. It belonged
to a family member who had passed on and he found it in a garage
or barn. I had to remove a fairly large mud dauber wasp nest from
the inside of the guitar. Luckily there were no wasps living in
there! |
|
|
|
|
|
|
|
|
|
|
|
|
|
|
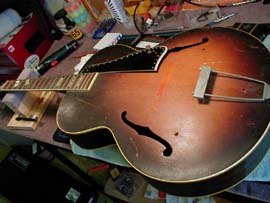
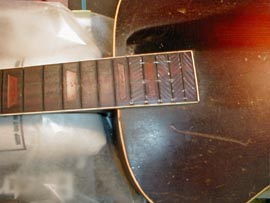
2.
It
was in bad need of a refret and several of the inlays had come
loose. We decided to replace the plastic inlays with some real
pearl. The fretboard had developed some fairly deep finger indentions
up in the open chord area, from years of chording. So I decided
I could sand those out when I leveled the fretboard. |
|
|
|
|
|
|
|
|
|
|
|
|
|
|
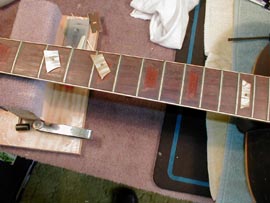
3.
First
I had to remove the frets. The rosewood fingerboard was very dry
and I knew it would be tough to remove the frets without chipping
the board so I slathered on some lemon oil and let it sit a couple
days before trying to remove the frets. The
frets came out easily and with no chipping. |
|
|
|
|
|
|
|
|
|
|
|
|
|
|
4.
Here
is the fretboard after the frets were removed. I checked it with
a straight edge and found a rise in the tongue that was preventing
me from getting the neck totally straight. I marked the area with
a white China marker and sanded it down until the board was straight. |
|
|
|
|
|
|
|
|
|
|
|
|
|
|
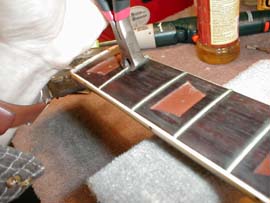
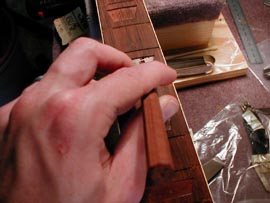
5. The
bottom of the inlay cavities were covered with 50 year old brown
adhesive (epoxy?). I had to scrape all of that out before I could
fit the pearl inlays. It was fortunate that these inlays match
the Les Paul Standard inlays, otherwise I would have had to cut
them myself which would have been more costly for the customer.
The Les Paul inlays were almost an exact match, I just had to
sand them a little to get them to fit.
|
|
|
|
|
|
|
|
|
|
|
|
|
|
|
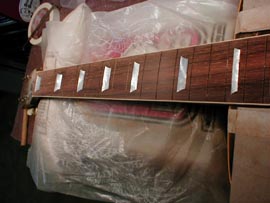
6.
Once
the inlays were installed, it was time to sand a little more with
a 12" radius block. The board came out really nicely. Then
I prepared the fret slots and was ready to start fretting.
|
|
|
|
|
|
|
|
|
|
|
|
|
|
|
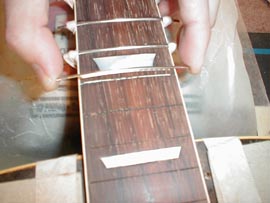
7.
Here,
I am installing the new fret wire. Notice how the tang has to
be cut to fit inside the binding. This is one reason why refretting
a guitar with binding is a little more money. You can see the
Titebond glue in the slot. This doesn't hold the fret in place,
it acts more as a gap filler. The frets seated nicely.
|
|
|
|
|
|
|
|
|
|
|
|
|
|
|
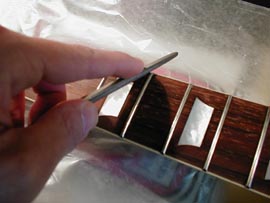
8.
After
the frets were installed I left them clamped up for 24 hours.
Then I clipped off all the fret ends, beveled them, and dressed
them. Here, I am rounding the fret ends with a 3 sided file.
|
|
|
|
|
|
|
|
|
|
|
|
|
|
|
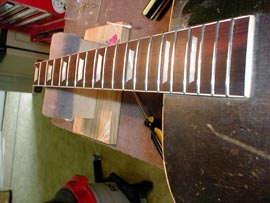
9.
Wow,
looks great! Can't wait to string it up and test her out.
I
could hardly believe how sweetly this guitar set up! The action
is really low without any buzzing. It plays like butter. If only
I could play it like Robert Johnson.
|
|
|
|
|
|
|
|
|
|
|
|
|
|