Kay Kraft Refret |
|
|
|
|
|
|
|
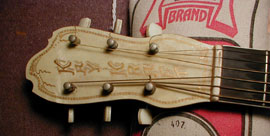
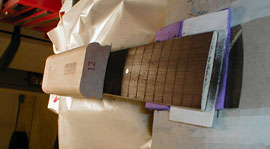
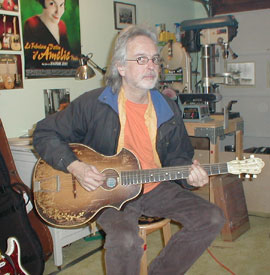
1.
This
is a funky guitar belonging to Gurf Morlix, a great guitarist,
producer, and songwriter. I'm a big fan of his so I was honored
when he asked me to refret his Kay Kraft archtop. Features
include a mahogany neck and body, mother of toilet seat headstock
overlay, an arched top and back, a round soundhole, and a gold
decorative motif. The body has a shape similar to a violin and
is actually very comfortable with a cutaway that conforms to your
leg while sitting. |
|
|
|
|
|
|
|
|
|
|
|
|
|
|
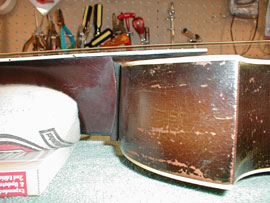
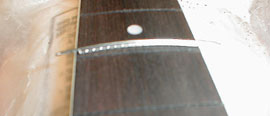
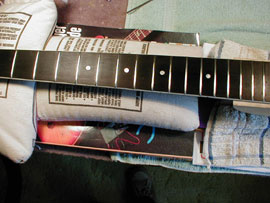
2.
These
Kay Kraft guitars were made by the Stromberg-Voisinet company
in the 1920's and 30's and feature a cool bolt-on neck that allows
you to adjust the neck angle and set string height. Bob Taylor
wasn't even born when these were made! You
can see how the end of the fretboard floats over the top.
|
|
|
|
|
|
|
|
|
|
|
|
|
|
|
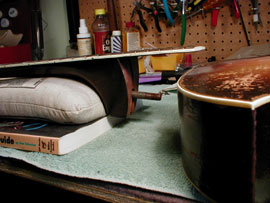
3.
This
particular guitar sounds great. Gurf said he uses on every recording
that he plays acoustic guitar on. The strings on this guitar seemed
to be as old as the guitar itself but Gurf said that is the way
he likes it. He doesn't change strings unless they break and he
asked me to save the strings and put them back on the guitar when
the job was finished. So off came the bolt neck and on with the
job... |
|
|
|
|
|
|
|
|
|
|
|
|
|
|
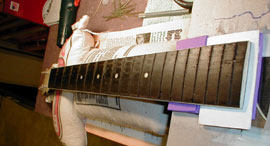
4.
This
guitar truly was a fretless wonder. Gurf wanted regular acoustic
fretwire installed so I said that the Stew Mac #148 would do the
trick. I
oiled up the board with lemon oil and let it sit overnight. Then
I pulled the frets very carefully and slowly. They came out nicely
with minimum chipping.
|
|
|
|
|
|
|
|
|
|
|
|
|
|
|
5. The
board had plenty of wear and needed to be trued up before I started
installing the frets. I used files and sandpaper to get it level
and then used a radius block to make sure the board had a uniform
arch. The radius of the neck before I worked on it was very similar
to an old Fender, about 7.25" but the bridge had a radius
of 12". So I went ahead and made the fretboard radius 12"
to match the bridge.
|
|
|
|
|
|
|
|
|
|
|
|
|
|
|
6.
Since
the neck has binding, I had to cut the tang of each fret to where
it would butt up to, but not into, the binding. Also, the underside
of the fret, where the tang was cut off, must be filed so it will
lay flat against the top edge of the binding. This takes more
time and care than fretting a neck without binding, that is why
it costs more.
|
|
|
|
|
|
|
|
|
|
|
|
|
|
|
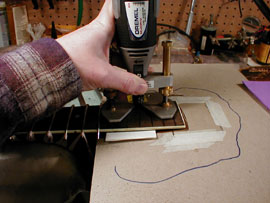
7. The
frets hammered in nicely. But when I got to the part of the fretboard
that hangs over the body I decided I was NOT going to hammer frets
into that unsupported piece of wood. I had to seat the frets in
the slots without hammering. The
best way to handle this section was to widen the fret slots with
the trusty Dremel tool so that the fret tangs would push in easily
by hand. Then I would fill the slots with epoxy and seat the frets
into the slots.
|
|
|
|
|
|
|
|
|
|
|
|
|
|
|
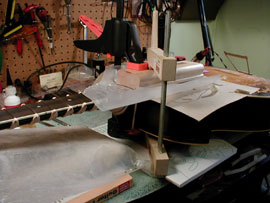
8.
Now
all the frets are in and I have to clean up a few spots of epoxy
before clipping the fret ends and dressing the frets. I
took the neck off of the body to dress the frets. That way I could
support the overhang for filing.
|
|
|
|
|
|
|
|
|
|
|
|
|
|
|
9.
After
I dressed the frets I gave the fretboard a lemon oil treatment
and polished each fret individually. The rosewood came to life
and the frets shined like mirrors.
|
|
|
|
|
|
|
|
|
|
|
|
|
|
|
10.
I
put the neck back on, adjusted the neck angle, and strung it up
with those grungy strings. The great Gurf
was happy. And
that makes me happy!
|
|
|
|
|
|
|
|
|
|
|