|
|
|
|
Intown
Guitar
Repair
is
an
authorized
dealer of... |
|


|
|
|

Acoustic
Preamp Installation
A customer brought in a beautiful Taylor acoustic
guitar, but it had no pickup and she wanted one for
playing live. She also wanted to be able to
control her volume and tone so I suggested installing an
onboard preamp. We chose the L.R. Baggs i-Beam
preamp and pickup. I'm a big fan of the i-Beam! |
|
|
|
|
|
|
|
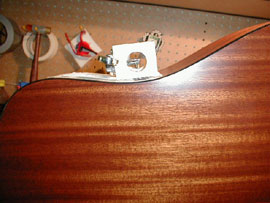
1.
Since the sides of this Taylor are solid wood, as opposed to
laminate, I wanted to reinforce the wood inside the guitar before
routing. This decreases the chance of the wood splitting along the
grain. This picture shows my "MacGyver-esque" clamp I made with a
block of wood and a guitar tuner. I drilled a hole in the guitar
just big enough to get a 10 gauge guitar string through. I applied
glue to my reinforcing wood and then I put the guitar string through
the reinforcing wood and through the guitar and then I tighten it
using this clamp. |
|
|
|
|
|
|
|
|
|
|
|
|
|

|
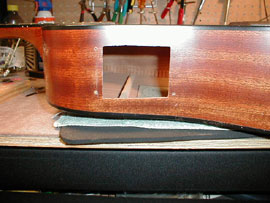
2.
The next day, after the glue dried, the Taylor was ready for
routing. I made a template out of plexiglas and screwed it onto the
guitar using the screw holes for the preamp. I routed the guitar
using my trusty Dremel tool.
|
|
|
|
|
|
|
|
|
|
|
|
|
|
|
3.
I was left with perfectly-sized cavity in which to mount the
preamp. Having two big holes in a guitar provides easy access so
I mounted the pickup onto the bridge plate inside the guitar and
drilled a hole for the strap jack. |
|
|
|
|
|
|
|
|
|
|
|
|
|
|
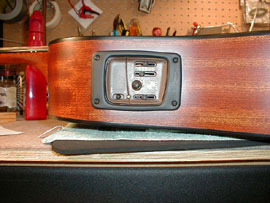
4.
All that was left to do was to install the output jack, connect
the wiring and drop the preamp into place. And there it is!
Ain't it pretty?
|
|
|
|
|
|
|
|
|
|